Friday, 22 November 2013

Blender Quick Tip: How to set up IK pole vectors without breaking the bind pose


Blender's IK system let's you assign targets (called Pole Vectors) which lets you control the orientation of the bend in the IK chain. But there's a common problem...


Say you're rigging an IK arm.
You need to be able to control the orientation of the elbows, and you do this using IK pole vectors.

But there's a catch, isn't there? When you add the pole vector, your binding pose breaks! That's bad. When you are rigging, Thou shalt honour the bind pose and keep it holy. Preserve it, pure, sanctified and unscathed.

How do we fix this?

Notice that Blender's IK constraint requires that you specify a Pole Angle. By varying this value, you can rotate the elbow around the arm's axis. What value should you put in there? Well, that's the problem. Yes, you can vary it by hand until the elbow is roughly in the binding pose, but if you do it this way, you won't get it exactly right.


To fix this problem, you need to understand exactly what the pole angle is. Check out my diagram.

Line A is the x-axis of the upper arm bone. Line B is drawn from the Pole Target and intersects the IK axis at 90°. The Pole Angle is the angle the IK system will put between lines A and B.

In other words, if the Pole Target is located exactly on the upper arm's positive x-axis, setting the Pole Angle to 0° will put the IK arm into the rest pose.


This is how you can set it up:
  • In pose mode, make sure your entire rig is in its rest pose (select everything, hit alt-S, then alt-R, then alt-G)
  • In edit mode, duplicate the upper arm bone. This will become your elbow target.
  • Keeping the duplicate bone selected, go into pose mode. Move the bone a distance of your choosing along its positive local x axis. Don't get this wrong - it has to be the the local x-axis in the positive direction.
  • Go to menu Pose -> Apply -> Apply Pose as Rest Pose
  • Add the IK constraint to the forearm bone as normal. Use the new bone as a pole vector. Set the Pole Angle to 0°.
Tada! You can flip between pose mode and edit mode, and the arm won't twitch.

Some other notes:
  • You don't have to use a pole angle of 0°. If the Pole Target is on the negative local x-axis, set the Pole Angle to 180°. Put the Pole Target on the positive local z-axis and set the Pole Angle to 90° - whatever it is you need to do.
  • What if you have 3 or more bones in the IK chain? Well, Blender uses the x-axis of the basal-most bone when using the Pole Angle. In a 2 bone arm setup, the upper arm is the basal-most bone.
That's it! Happy rigging!


Wednesday, 13 November 2013

Tutorial: Penrose Tiling in Blender


Building tiling patterns in Blender is pretty easy if you know how to use the array modifier... at least, it's usually easy if the tiling pattern repeats itself over space. For example, you can use the array modifier to construct practically any pattern from one of the wallpaper groups.

But that's not what I'm talking about today. I want to talk about Penrose tiling. Penrose tiling is a non-periodic tiling pattern. This means means it does not repeat itself as you move through space, and Blender's array modifier therefore can't be used to construct the pattern. Instead, I used Blender's scripting tools to do Penrose tiling.
(Edit: Penrose tiling is pentagonally symmetric, and you actually can use the array modifier speed up the process of making pentagonally symmetric patterns- however- this process would still require that you do most of the work by hand. Working by hand is slow, and it's very easy to make a mistake early in the process which later results in the pattern containing "hole")

Check out what I made:


I was surprised that I couldn't find anything online about Penrose tiling in Blender, so I decided to write something up myself.  The scripts I used are adapted from the algorithm described in this blog post I found about Penrose tiling. Please check out the link if you're curious about how the script works. If you want to skip this tutorial and just try out my Blender-adapted version of the script, I pasted it at the end of this post.

The steps of my process:

  • Generate a Penrose patterned mesh with the script
  • Use selection tricks to isolate specific patterns of edges in the mesh
  • Dissolve those edges to make new shapes (stars, diamonds etc.)
  • Edge split the shapes into islands. Separate the mesh into different objects according to shape.
  • The rest. (Solidify, bevel, light, animate, render etc.) 


Start by opening a new blender scene, open up the text editor, copy and paste my script, and press the Run Script button.  The script should generate a ten-sided grey disc in the 3D viewport.  Boring. 


Look at the disc in edit mode (right click to select it, and hit tab to enter edit mode). The disc is actually an interesting pattern of triangles. Less boring!

This is our base pattern. From here, I found a way to pull out more interesting patterns of shapes. Try mine out. If you come up with your own, please show me how you did it!

Go into edge mode (ctrl-tab then 2). If you look, the mesh has edges of three different lengths. Select a short edge, then go to the menu Select -> Similar -> Length.

Due to roundoff error, not all of the short edges are exactly the same length. Because of this, the select similar length command might not get the edges you want. If you play with it's threshold value (see picture below), you should be able to get all of the short edges in the mesh, resulting in a selection that looks like this:

Hit x -> Dissolve Edges to make all the small edges disappear. The mesh should now look like this:


Do the same thing to the long edges. Select all of them and dissolve them.


That's the pattern at the top of this post! Cool!

So, at this point, we can start trying to pull shapes out of the pattern using some selection trickery. Warning: do exactly as I say in the order I say it, or it might not work.


Go into face-select mode (ctrl-tab then 3), select a thin diamond, and select -> similar -> area. You should get this:

 Switch to vertex mode (ctrl-tab then 1), and invert the selection (ctrl-i). Deselect the loop of vertices on the edge of the mesh.


You should get this. The center of all the star shapes are selected. Dissolve them! (x -> Dissolve Vertices).


Oo, now you have stars. See? 

We can stillget some more shapes.


Switch to face select mode, and select all the thin diamond faces again. Invert the selection. Switch to edge mode. Invert the selection. Dissolve the edges that remain selected. This trick should merge adjacent pairs of thin diamonds into an angular pac-man-like shape.

One more trick.
There are a few places in the mesh where four fat diamonds make an incomplete star. In vertex mode, select the center vertex of an incomplete star.

Now go Select->Similar->Amount of connecting edges, switch to edge mode, and dissolve the selected edges.


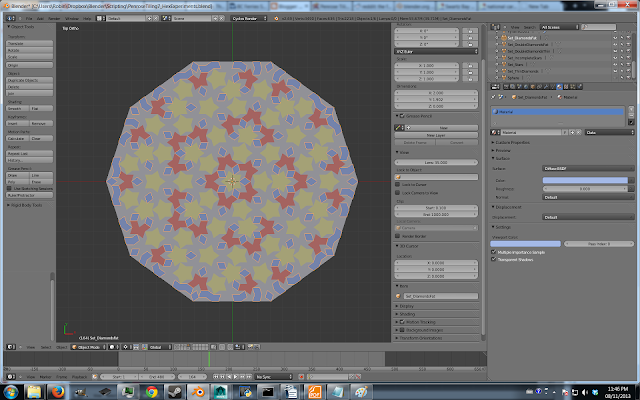
The hard part is over, and the resulting pattern should look like this ->

If you're familiar with Blender, the rest of what I did was pretty straightforward, so I'll be brief.

We don't need to keep all the shapes as a single mesh anymore. Selecting all the vertices (ctrl-a), and edge split everything (ctrl-e->Edge split). Now if you select the stars (and only the stars... remember, use Select->Similar->Area), you can split that set of polygons into a new object (p->Selection). In this way, separate each set of shapes into their own mesh object.

Now we can select between shapes in object mode, and assign different materials (with different colours) depending on the shape.


Above, in this last image, you can see the modifiers I used and their settings.

I put in lights, built in a looping animation, and rendered.  So, that's pretty much it!

One last comment: as you may have observed, Penrose tiling is pentagonally symmetric. Interestingly enough, this is the reason why Penrose tiling is non-periodic. The crystallographic restriction theorem proves that any regularly spaced 2D pattern can't be pentatonally symmetric. Just try it!  If you attempt to create a tiling pattern of regular pentagons, you will fail!.

Now, you might be wondering why the python subdivision algorithm is using the golden ratio, φ. Well, I did some reading, and apparently φ (the golden ratio) appears a lot when you're working with pentagonal symmetry.  This happens because the cosine of 72°( which is one fifth of 360°) is φ/2.


Happy tiling!
~ CG From Space


My Blender-adapted script:


import bpy
import bmesh
import math
from mathutils import Vector

subDivIterations = 6

goldenRatio = (1 + math.sqrt(5)) / 2

def subdivide(triangles):
    result = []
    for color, A, B, C in triangles:
        if color == 0:
            # Subdivide red triangle
            P = A + (B - A) / goldenRatio
            result += [(0, C, P, B), (1, P, C, A)]
        else:
            # Subdivide blue triangle
            Q = B + (A - B) / goldenRatio
            R = B + (C - B) / goldenRatio
            result += [(1, R, C, A), (1, Q, R, B), (0, R, Q, A)]
    return result

# Create wheel of red triangles around the origin
def createWheel():
   
    triangles = []
  
    for i in range(10):
        theta_i = i*2.0*math.pi/10.0
        theta_ip1 = (i+1)*2.0*math.pi/10.0
      
        x_i = math.cos(theta_i)
        x_ip1 = math.cos(theta_ip1)
      
        y_i = math.sin(theta_i)
        y_ip1 = math.sin(theta_ip1)
      
        A = Vector((0.0,0.0,0.0))
        B = Vector((x_i,y_i,0.0))
        C = Vector((x_ip1,y_ip1,0.0))
      
        if i % 2 == 0:
            B, C = C, B  # Make sure to mirror every second triangle
        triangles.append((0, A, B, C))
    return triangles


# Generate map of tiling
listTriangles = createWheel()
for x in range(subDivIterations):
    listTriangles = subdivide(listTriangles)

# Construct the lists necessary for generation of geometry
listVertices = []
listFaces = []
for triangle in listTriangles:
    # write the vertex coords to the list, and remember the vertex indices
    # In Blender, the mesh data stores each vertex as a tuple of 3 floats.
    newVertex1 = (triangle[1][0],triangle[1][1],triangle[1][2])
    newVertex2 = (triangle[2][0],triangle[2][1],triangle[2][2])
    newVertex3 = (triangle[3][0],triangle[3][1],triangle[3][2])
  
    listVertices.append(newVertex1)
    newVertex1_i = len(listVertices) - 1
    listVertices.append(newVertex2)
    newVertex2_i = len(listVertices) - 1
    listVertices.append(newVertex3)
    newVertex3_i = len(listVertices) - 1
    # Define the faces by index numbers. Each faces is defined by a list of the vertex indices belonging to the face.
    # For triangles you need to repeat the first vertex also in the fourth position.
    newFace = (newVertex1_i,newVertex2_i,newVertex3_i)
    listFaces.append(newFace)
  

# Build the mesh in Blender's API

mesh = bpy.data.meshes.new("penroseMesh")   # create a new mesh

ob = bpy.data.objects.new("Pyramid", mesh)      # create an object with that mesh
ob.location = Vector((0,0,0)) #by.context.scene.cursor_location   # position object at 3d-cursor
bpy.context.scene.objects.link(ob)                # Link object to scene

# Fill the mesh with verts, edges, faces
mesh.from_pydata(listVertices,[],listFaces)   # edges or faces should be [], or you ask for problems
mesh.validate(True)
#mesh.update(calc_edges=True)    # Update mesh with new data

bm = bmesh.new()
bm.from_mesh(mesh)
bmesh.ops.remove_doubles(bm, verts=bm.verts, dist=0.001)
bmesh.ops.recalc_face_normals(bm, faces=bm.faces)
bmesh.ops.reverse_faces(bm, faces=bm.faces)
bm.to_mesh(mesh)
mesh.update()